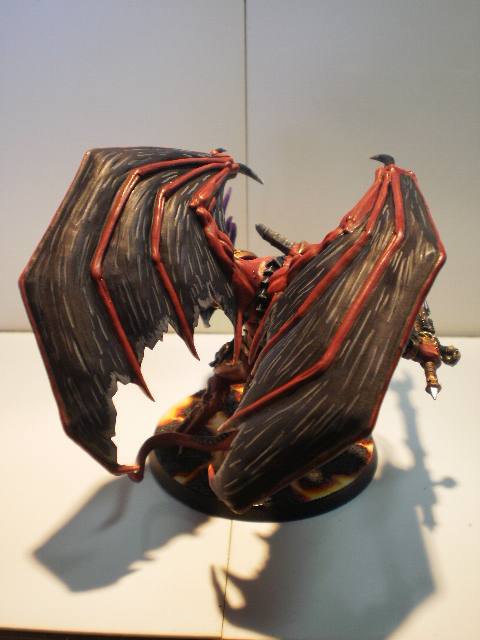
So it has been a while since I last posted on the blog, sometimes life gets in the way. With that being said, now onto what you see before you. This the new Chaos Heldrake kit from Games Workshop. It is infact a nice kit right out of the box pretty straight forward to build. I generally love converting models so when I get something new they generally never get built how they appear on the box. So I went to work on it. I did not want to do it the normal looking way and had to really think about what I was doing when I started this project. I want to the body to be more upright which means I had to reposition the legs in a fashion to hold the weight and have the model balanced. I made a few small mods to the legs and feet to get what I was looking for, nothing serious or really worth mentioning. The body of the model had a big gigantic hole in it where the flyer stand would normally mount and this was an issue, cant' have a hole in the middle of the model, just would not look right. So with some plastic-card and green stuff, I went to work removing this hole. It was pretty straight forward and turned out awesome. Now came the hard part the neck and head. The neck had to be cut into 3 sections to get the right angle needed to make the pose look right. And then re-glued and filled back together. This also helped to get the head in the right position as well, there was a lot of green stuff added to the neck and I am not 100% happy with it, but it looks alright, I have seen worse. So with the head in the right spot and the neck properly postioned I moved on to the arms. Now the kit normally has you attach the wings to the arms but I felt that after trying it out it just did not look right at all with the pose I had started working on already, and starting over was not an option. So the wings were removed from the arm assembly, well they actually were never attached, but anyways. Now there were voids in the arms cowels and plating so they had to be smothed out and filled plus the arms had to be cut and repositioned because the current design did not work. So I cut them at the spot where an elbow would be and used parts from the Defiler kit in the arms to create an elbow. Easy and effective, now I could positon the arms accordingly. And that is what I did. So all that is left is the wings. With the wings I removed the ball socket joint on the end and gave them a flat edge where that portion of the piece was before. I then found a parttern that I felt would work perfectly along the back, with a little inspiration from a yu-gi-oh dragon card I recall seeing. And there you have it the model was built. Now I needed a place for this bad ass to stand that would still have the same height as the flyer on its stand and thus the base was created using Green stuff and cork board. The flames were all hand sculpted and the rock are made from layering cork board. I then added a modified guardsmen to the base to give it some life and story. As for the paint it speaks for itself and overall I feel it turned out awesome. I spent a lot of time on the paint and it would make this post extremely long, so I will save that for another time. Next up on the blog a Blood Angels Hero, till then.
Showing posts with label Chaos. Show all posts
New Chaos Heldrake Conversion!!
So it has been a while since I last posted on the blog, sometimes life gets in the way. With that being said, now onto what you see before you. This the new Chaos Heldrake kit from Games Workshop. It is infact a nice kit right out of the box pretty straight forward to build. I generally love converting models so when I get something new they generally never get built how they appear on the box. So I went to work on it. I did not want to do it the normal looking way and had to really think about what I was doing when I started this project. I want to the body to be more upright which means I had to reposition the legs in a fashion to hold the weight and have the model balanced. I made a few small mods to the legs and feet to get what I was looking for, nothing serious or really worth mentioning. The body of the model had a big gigantic hole in it where the flyer stand would normally mount and this was an issue, cant' have a hole in the middle of the model, just would not look right. So with some plastic-card and green stuff, I went to work removing this hole. It was pretty straight forward and turned out awesome. Now came the hard part the neck and head. The neck had to be cut into 3 sections to get the right angle needed to make the pose look right. And then re-glued and filled back together. This also helped to get the head in the right position as well, there was a lot of green stuff added to the neck and I am not 100% happy with it, but it looks alright, I have seen worse. So with the head in the right spot and the neck properly postioned I moved on to the arms. Now the kit normally has you attach the wings to the arms but I felt that after trying it out it just did not look right at all with the pose I had started working on already, and starting over was not an option. So the wings were removed from the arm assembly, well they actually were never attached, but anyways. Now there were voids in the arms cowels and plating so they had to be smothed out and filled plus the arms had to be cut and repositioned because the current design did not work. So I cut them at the spot where an elbow would be and used parts from the Defiler kit in the arms to create an elbow. Easy and effective, now I could positon the arms accordingly. And that is what I did. So all that is left is the wings. With the wings I removed the ball socket joint on the end and gave them a flat edge where that portion of the piece was before. I then found a parttern that I felt would work perfectly along the back, with a little inspiration from a yu-gi-oh dragon card I recall seeing. And there you have it the model was built. Now I needed a place for this bad ass to stand that would still have the same height as the flyer on its stand and thus the base was created using Green stuff and cork board. The flames were all hand sculpted and the rock are made from layering cork board. I then added a modified guardsmen to the base to give it some life and story. As for the paint it speaks for itself and overall I feel it turned out awesome. I spent a lot of time on the paint and it would make this post extremely long, so I will save that for another time. Next up on the blog a Blood Angels Hero, till then.
Chaos Black Legion & Daemon Prince
So this is a small Chaos Black Legion I was working on last month. I don't get a lot of Chaos projects so when i had the opportunity to take this one on, I jumped all over it, especially since there was a Daemon prince involved. Such a beautiful plastic kit. Well the models came to me already built so all i had to do was work my magic on them. The models were to be painted up in the standard Black legion color scheme that so many 40k players are familiar with, the black and gold. The only thing that was done differently was that the hand on the Daemon prince was to be painted purple to represent the mark of slaanesh, something the customer wanted. I was also able to have my own creative input on the basing for the models and felt nothing would better then to do a lava field to add to the darkness that these models represent. But about the paint job it was pretty straight forward with nothing really special, all the traditional codex colors. If you have any questions then feel free to let me know and i will do my best to help ya out. As for this project both the customer and I were very happy with how they turned out and started working ona night lords project which will be showcased come the new year. So keep checking back and don't forget to follow me to be ahead off the game and see projects before they are posted anywhere else.
Kharn the Betrayer - Custom Commission
Well another project I have been working on for a while. This time it is my version of Kharne. If your not familiar with him, he is from the Chaos Space Marine Codex. Now GW already has a old dated model of him and this was meant to be a more updated version of him. I used the basic pieces from a Khorne Beserker and only a few pieces from the original Kharne model. I felt he deserved a little more then a standard Khorne Chain Axe. So I made a larger one from 4 Chain axes and a piece of brass rod and 1 skull. Pretty easy to do. The head and back pack were just taken from the original. The plasma gun was cut from the arm and mounted how you see it. Also I know Kharne has an arm exposed but I wasn't able to find anything I liked. So he is in a full suit of armour. I also changed up some of the colors and painted lava into one of the shoulders pads. Within that, is the symbol of Khorne. Green stuff was needed to mount the arms the way I wanted them. He was then mounted on Lava base. I felt it added to the evil that the character exudes. It also ties in with his shoulder pad. The model also has a display plinth that he stands on. Once again I feel I di a great job bringing an old model to new life and I always love projects like this. Till next time.
Khorne Juggernaut
2009 Golden Demon Finalist - Archaon
After cleaning it up and figuring out the colors, I started painting it. About 3 months and roughly 150+ hours of painting, I am almost finished. I am very happy with how it has come along and it will meake a great centerpiece to my Warriors of Chaos army.
What I have to finish up on this project is just some small mistakes that I have found and build up a small piece to fit the model into on the display base. Should have that finished in the next few weeks. The finished project will be posted shortly ther after.
Khorne ChaosTerminator Lord
Subscribe to:
Posts (Atom)


